Fix “You Don’t Have Permission” Error and Grayed Out “Keep Personal Files and Apps” Option During Windows Server In-Place Upgrade

Fix “You Don’t Have Permission” Error and Grayed Out “Keep Personal Files and Apps” Option During Windows Server In-Place Upgrade

If you receive the “You don’t have permission” error message when you try to mount an ISO image, and the in-place upgrade doesn’t let you select “Keep Personal Files and Apps” because it’s grayed out, follow these steps to fix the issue.

Let’s break down the issues step by step. When you download the Windows Server 2019 and Windows Server 2022 from Microsoft’s evaluation center, you may run into a problem when mounting the ISO file, such as the “Couldn’t Mount File” error:

You don't have permission to mount the file error that occurs when you mount an I S O image.

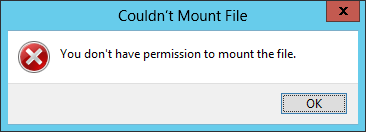
If you receive this error, it’s likely that the ISO still mounts okay. You may receive the error because the default drive letter that the ISO mounts to is used by a network drive, USB flash drive, or another external storage device.

If the ISO mounts even after the error message, you can proceed with an in-place upgrade for Windows Server.

Preparing for In-Place Upgrade

You shouldn’t run into any issues if you’re doing a fresh install – not keeping your files, settings, and apps. However, if you want to use the Keep Personal Files and Apps option and it’s grayed out – you will need to continue with some additional steps outlined below:

Your files, apps, and settings can't be kept because you're installing an edition of windows that's different than the one you're currently using  

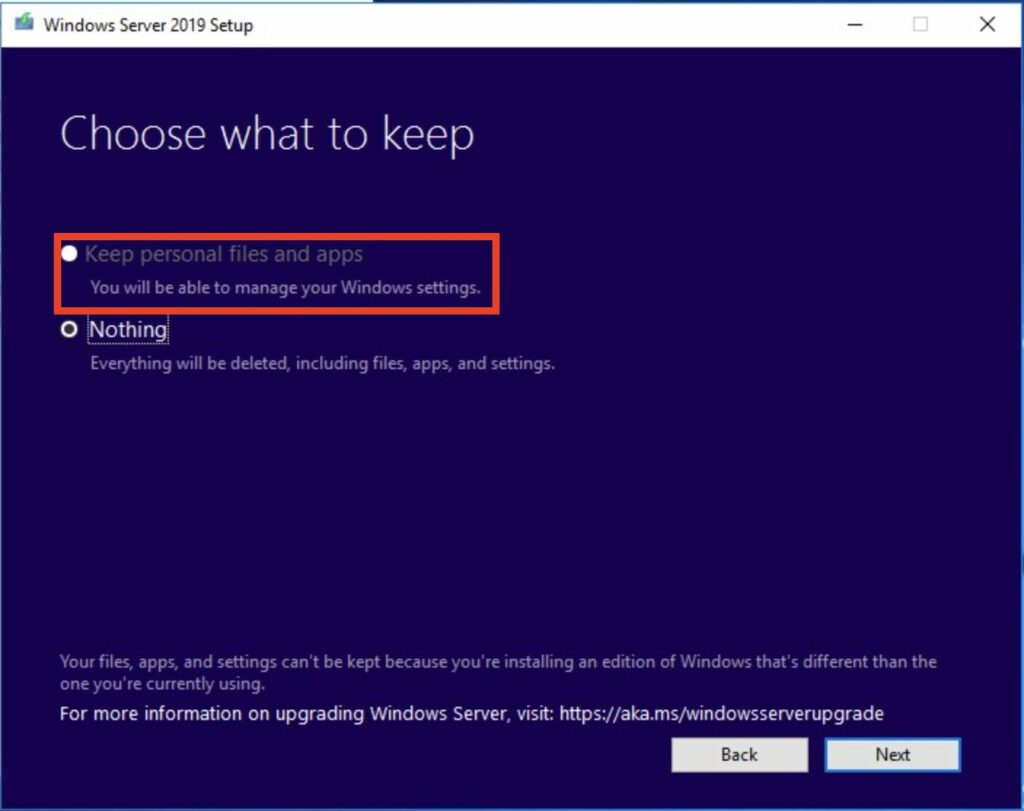
The steps below work for in-place upgrades for Windows Server 2016 to Server 2019, Server 2022, and even Server 2025, which is currently in beta. Follow the steps if the option to keep personal files and apps is grayed out.

  1. Create two folders – one named ISO and another named mount- at the root of your C drive.
  2. Save the ISO file for the Windows Server version you’re upgrading to in your created ISO folder.
  3. You must extract the ISO files to modify the evaluation registry during the Windows server installation. To do this, download 7Zip.
  4. Right-click on the ISO file – in the context menu, select 7Zip and choose the Extract to “ISOFilename\ option. For example, the ISO name in the screenshot below has the name SERV2016, so we’re extracting to “SERV2016\”
  5. Open a command prompt as an administrator and run the following commands. In the screenshot above, we’re using the SERV2016 ISO as an example; you will have to update the command to include the name of your ISO. Additionally, the example above is for Windows Server Standard Edition—if you’re using the data center version, update the fourth command to match your current edition.
 
				
					dism /mount-wim /wimfile:c:\ISO\SERV2016\sources\install.wim /mountdir:c:\mount /index:2
dism /image:c:\mount /get-currentedition
dism /image:c:\mount /get-targeteditions
dism /image:c:\mount /set-edition:ServerStandard
dism /unmount-wim /mountdir:c:\mount /commit


After successfully doing the steps above, you can run the in-place upgrade and keep your current files and apps.

Running the In-Place Upgrade

After modifying the evaluation registry, follow these steps to run the in-place upgrade:

  1. Run Setup from Extracted Folder:
    • Open the extracted ISO folder.
    • Run setup.exe from this folder instead of mounting the ISO file. The extracted folder contains the modified setup file that matches your current Windows Server version.

If this is your first time performing an in-place upgrade, please note that installation can take a few hours. Be patient. Additionally, we recommend performing a clean install and migration rather than an in-place upgrade for Windows Servers used for services such as Active Directory, DNS, and on-premise Exchange. 

Conclusion

Following these steps, you can resolve the “You don’t have permission” error and perform an in-place upgrade while keeping your personal files and apps. This guide applies to upgrades from Windows Server 2016 to Server 2019, Server 2022, and even the beta version of Server 2025. The same steps should work with Server 2012 R2 – However, we have not tested it.

If you found this guide helpful, share it with others who might encounter the same issues. For more detailed IT support and troubleshooting tips, visit our website regularly.

To ensure the quality of service and convenience for our customers, all of our services and development are 100% US-based out of our office in Minnesota. 

We can meet virtually or come to your office (even if you’re across the country). If you’re in Minnesota, please feel free to visit our office!